Let's make nature unique with Xfrog
With this application you will be able to create all kinds of dizzying landscapes. This modeling and animation system specializes in the simple process of creating complex organic structures.
Xfrog contains tools for creating simple geometric primitives with information about the hierarchy of components.
With Xfrog you have primitives like cube, sphere, etc.; and components such as wood, etc. By experimenting with combinations of components and defining specific component values, you can easily generate complex objects that replicate their natural counterparts.
Xfrog is a procedural organic 3D modeler that allows you to generate 3D special effects for natural environments.
Natural objects created in Xfrog have been used in more than 100 films and received a Science Oscar nomination.
Xfrog is available for use as a separate application, as well as as a complementary program for Maya and Cinema 4D.
Application tools - let's tell you a little about them:
- “Branch Object” tool - with its help we can create complex multi-level branching structures with numerous parameters that give them a natural look.
- The Phyllotaxis tool is designed to place objects on an arbitrary surface of rotation.
- • The Hydra tool will arrange objects in a circular pattern
- The Curvature tool generates splines that are used as a basis for naturally curved leaves or branches.
- The Tropism tool allows spline-based objects to bend in a spontaneous direction or position.
- The Reject tool is used to reject Branch objects.
Be careful when downloading and installing Xfrog on your computer. There are two versions of the program and the lightweight Lite version does not have animation capabilities.
Now a little practice - we'll tell you how to create a tree
The steps are simple and clear, just like the program itself.
Click the “Start” button and select “Xfrog” from the “Greenworks” menu. The program will start, and in its window you will see an empty “Hierarchy Editor” window, in which we will work.
Step 1
Select the “Simple” component. To do this, drag it from the “Libraries” window to the “Hierarchy Editor” window. Link the “Simple” component to the “Camera” component in the “Hierarchy Editor” window. Linking is done by dragging one icon onto another. Select the "Simple" node and in the "Parameter Editor" window, go to the "Basic" tab. In the “Name” field, enter the text “Scale”. The new component name will also appear in the “Hierarchy Editor” window.
Step 2
Create a “Tree” component and bind it to the previously created “Simple” component. By default, “Tree” creates a “Tube” primitive, so when you create it, a cylinder will appear in the “Model View” window. Select the element and in the “Parameter Editor” window rename it “Trunk”, since it will represent the trunk of the future tree.
Step 3
Create a second “Tree” component and rename it “Branch1”. This component will represent the first level branches. Link the “Branch1” component to the “Trunk” component. The “Tree” elements: “Trunk” and “Brunch” must be interconnected by multiple connections, which is done by default. To change the type of connection, click on it (the arrow connecting objects) with the left mouse button and select the type you need from the list located at the bottom of the “Hierarchy Editor” window.
Step 4
Create two more “Tree” components. Name them “Branch2” and “Branch3” and link “Branch2” to “Branch1” and “Branch3” to “Branch2”. Make sure that all branches are connected with multiple links.
Step 5
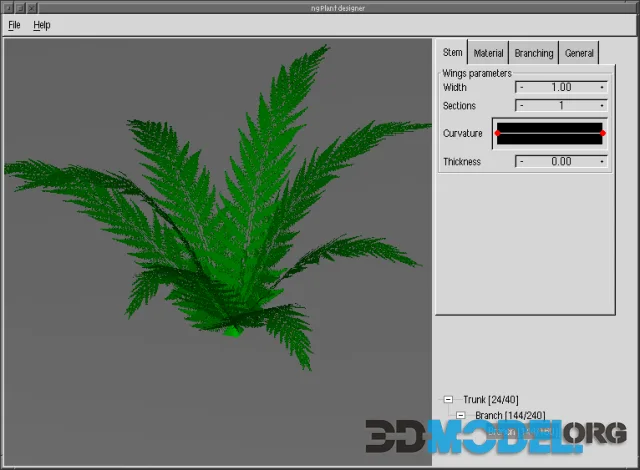
Now the basic skeleton of the tree is ready. Next, we configure the component parameters to obtain the type of tree we need. All parameters specific to the “Tree” component are located in the “Tree” tab of the “Parameter Editor” window. First, let's go to the “Stem” section and set the “Segments” value to be greater than the default. The change will only become noticeable if you switch to Wireframe mode. To do this, use the “Shading” menu of the “Model View” window.
Step 6
Go to the “Shape” parameter and click the “Edit” button. The curve editing window will open, with which you can adjust the shape of the trunk. The trunk is formed from it by rotation around a horizontal axis. The editing window shows a curve with three vertices. You can edit vertices by selecting them and moving them to another location. You can delete a vertex by selecting it and pressing the Backspace key. To select multiple vertices, press and hold the Shift key. To insert a new vertex, double-click the left mouse button at the corresponding point on the curve.
Step 7
In cross section, the trunk is a triangle (which is also caused by the desire to simplify the model as much as possible). To achieve a rounded trunk shape, you need to adjust the parameters of the primitive that forms it. By default, the "Tree" component is derived from the "Tube" primitive. Go to the “Primitive” tab in the “Parameter Editor” window and set the “Points” parameter to 12.
Step 8
Usually young trees have thinner branches than ours. Select the second “Tree” component called “Branch1” in the “Hierarchy Editor” window. Go to the “Shape” parameter of the “Tree” tab in the “Parameter Editor” window and move the leftmost and middle point down, just below the middle of the overall height of the window. To do this, it is not necessary to use the “Edit” button. Coarse movements can be made using the curve thumbnail located to the right of this button.
Step 9
Typically, young trees have a long section of the trunk at the bottom, free of branches. To achieve the same thing on our model, select the “Trunk” component again and go to the “Branches” section of the “Tree” tab. All parameters located in this section affect branches, that is, they provide the opportunity for an ancestor object to influence its descendants. As noted above, branches inherit scale from their ancestor - the trunk. Now we need to configure the “Distribution” parameter, which is responsible for the distribution of branches along the trunk. Click the “Edit” button to open the “Distribution Editor” window. The curve in this window displays the statistical distribution of branches along the trunk. The left part of the curve corresponds to the base of the trunk, the bottom - to the top.
Step 10
The angle at which the branches extend from the trunk also does not correspond to reality. The value of the angle is controlled by the “Angle” parameter, which is also passed from the component to its descendants. The angle for the first level branches is set by the “Trunk” component. Go to the “Angle” parameter, click the “Edit” button and adjust the curve. To achieve the same for the model, use the “Gravitropism” parameter of the “Branch1” component. This parameter simulates the effect of gravity on a component. Click the “Edit” button for the “Gravitropism” parameter in the “Tropisms” section of the “Tree” tab. In the “Gravitropism Editor” window, set up the curve as shown in the figure.
Step 11
A real young tree usually looks more elongated. Stretch the model a little using the “Trunk” tool and increase the “Length” parameter in the “Stem” section of the “Tree” tab.
However, the model is now too large. To configure them, select the “Scale” parameter, which allows you to scale the entire model at once. Go to the “Basic” tab of the “Parameter Editor” window. At the bottom of the “Transformation” section, switch the “Lock Scale” option to the “on” position. This allows you to scale the model proportionally in all directions. Then set one of the “Scale” parameters to the position shown in the figure. The rest will take the same value.
By the way, on our site you can download thousands of ready-made 3D plant models (link) for architectural projects, game engines and more. These are all kinds of bushes, trees, decorative and indoor plants, phytowalls, grass and much more. We also suggest you to visit the category with architectural 3D models (check the link) - there you can find a huge selection of environment details for your projects: ready-made houses and cottages, urban and street elements, architectural details, landscapes and even full 3D scenes.
Ctrl
Enter
Noticed a misTake
Highlight text and press Ctrl+EnterRelated news:


Comments (0)
Information
Users of Guests are not allowed to comment this publication.
Users of Guests are not allowed to comment this publication.