Texturing in Blender
Blender is a free program for creating and editing three-dimensional graphics. It is distributed on all popular platforms, has open source code, and is available completely free of charge to everyone who wants to use it. These features have made it extremely popular among both novice users and true modeling professionals. The software is often chosen as the main working tool for large and serious projects.
If you're interested in texturing with Blender, there are a few things you should know. Here's a quick tutorial:
Guidance
Now let's say you have finished the modeling process in Blender. You will then be asked to apply a texture to the object. It cannot, however, be applied until it is done. That is why in Blender you must always create them first.
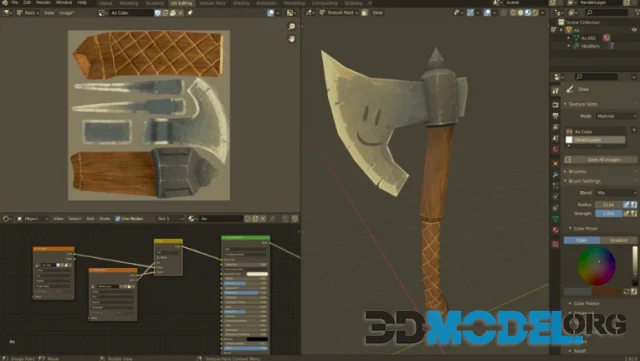
After you have done this, it is time to start texturing. In your working window in Blender, you will see the "Textures" tab. To create a new object, go to it by clicking the "New" button. Then the following fields will appear in front of you:
- Texture Channel - superimpose several textures on one object.
- Name - here you can give a name to the texture, so you can easily find it later.
- Texture Type - this field allows you to choose between preset and custom textures. Here you can select different files: pictures or videos.
- Mapping - here you can specify how the texture is to be placed on the object, make an offset and adjust it to the right size.
- Influence - Here you can fine tune the texture by adding elements like transparency, roughness, brightness, etc.
Blender has quite a few good preset textures, and quite often you can achieve impressive results with them. But you can download textures from our website - they are perfectly optimized for various tasks, whether you're creating a video game or an architectural project.
Blender supports jpeg, png, targa, tiff, and bmp images. You can also find all these formats in our pbr textures catalog. You can also use a video file as texture. The process of using it is quite simple - you need to specify from which frame to which you want the video to be played and whether it should be looped or not.
Once you start working with textures, you will probably notice that they are not quite evenly matched to the model. In the "Mapping" menu, you can change the way the texture is mapped. There are four types of projection available here:
- Flat - suitable for flat objects;
- Cube - suitable for objects with a cubic shape;
- Tube - suitable for objects with rotational geometry;
- Sphere - suitable for spherical objects.
Using textures, you can create the illusion of changing the shape of the mash object. This can be very useful if your task is to recreate an unusual and attractive environment. You can make the same texture look completely different. Say, in one case it will be more realistic and in another more cartoonish. And all you have to do is manipulate the "Normal" slider by moving it to "off" or "-1". By changing the type of blending, you can achieve interesting results.
Also keep in mind that the settings from the sections on materials and textures are actually very closely related to each other. So you will need to adjust the settings in both tabs to get the results you want. In the case of overlaying a large number of textures on a complex object, don't forget to do UV as well.
If you need any materials for Blender, you can simply take a look at the catalog on our site. There you will find many ready-made solutions in the form of 3D models and individual textures, which you can flexibly interact with in the utility and get very interesting results. Also don't forget to download useful addons for Blender.
Other articles:
Ctrl
Enter
Noticed a misTake
Highlight text and press Ctrl+EnterRelated news:

Comments (0)
Information
Users of Guests are not allowed to comment this publication.
Users of Guests are not allowed to comment this publication.